Introduction: Starting the Clarinet Journey—One Squeak at a Time
So, you’ve picked up the clarinet—or maybe you’re just thinking about it. First off, high five! You’re stepping into the world of music, and honestly? That’s huge.
Now, I get it. Starting anything new can be overwhelming, especially something like a musical instrument. All those keys, reeds, fingerings… not to mention the squeaks. Can you imagine playing in front of someone and hitting that high-pitched dolphin sound by accident? Yikes. But hey, we’ve all been there.
This guide? It’s here to help. I’m talking about real, honest, no-fluff beginner clarinet playing tips that actually make sense. Whether you’re 12 or 52, learning the clarinet should be fun—not frustrating.
So grab your clarinet, take a deep breath (you’ll need that later), and let’s break it all down together.
Why the Clarinet is a Great Choice for Beginners
If you’re wondering whether you picked the right instrument, let me put your mind at ease: yes, the clarinet is absolutely a fantastic choice for beginners. Here’s why:
Versatility Across Music Genres
The clarinet isn’t just a “band” instrument. Nope. .
It shines in:
- Classical orchestras
- Jazz bands
- Klezmer groups
- Marching bands
- Solo pieces
- Even in movie scores!
That means, as you improve, you’ve got options. You can experiment with styles and find your musical voice. Isn’t that exciting?
Wide Range of Notes and Emotion
The clarinet has this beautiful, almost human voice. It can sound deep and mellow, or light and playful. You can whisper or shout with it (musically speaking).
One minute you’re playing a smooth lullaby, and the next, you’re blasting through a jazzy solo. It really feels like you’re speaking through the instrument.
Easier to Start Than Many Wind Instruments
Compared to oboes or French horns, clarinets are more forgiving.
Sure, the learning curve is still there, but:
- You don’t need massive lung power
- You get quicker sound results
- The fingerings are logical and build progressively
And once you get those basics down? You’re off to the races.
It’s Emotionally Rewarding
Honestly, few things beat the feeling of playing your first song all the way through. I remember the first time I played “Hot Cross Buns” without a squeak—I felt like a rock star. It made me feel proud, excited, and more than anything, motivated to keep going.
Can you imagine how awesome it’ll feel when your fingers start moving smoothly, and your notes actually sound like real music? Total goosebumps.
Getting to Know Your Clarinet
Okay, let’s talk gear. Your clarinet might look like one long mysterious stick right now, but it’s actually made up of a few different parts—and getting to know them is the first real step in becoming a confident player.
The Main Parts of the Clarinet
Here’s a quick breakdown from top to bottom:
- Mouthpiece – This is where the magic begins. You’ll attach the reed here and use your breath to create sound.
- Barrel – Connects the mouthpiece to the upper joint; helps fine-tune pitch.
- Upper Joint – Where your left-hand fingers go. Lots of keys here.
- Lower Joint – Your right-hand section, also full of keys.
- Bell – The flared end that helps project sound and tone.
Pro Tip: Handle the bridge key (between the upper and lower joints) with care when assembling. That thing is fragile!
How to Assemble It Properly (Without Breaking Anything)
Let’s walk through it:
- Grease the corks before your first few plays to ease assembly.
- Start from the bottom up – bell, lower joint, upper joint, barrel, mouthpiece.
- Twist gently, don’t shove or force pieces together.
- Watch that bridge key! Always press it down when connecting the two joints.
Take your time, breathe, and don’t panic if it’s a bit tight. It gets easier, promise!
Basic Cleaning Tools
Every clarinet player needs these:
- Swab (cloth with weight) – For removing moisture inside the body.
- Cork grease – Keeps corks smooth and easy to connect.
- Mouthpiece brush – Scrubs out the gunk (and there will be gunk).
- Reed case – Protects your reeds from breaking or warping.
- Pad paper – Helps dry sticky keys.
Think of this like your clarinet’s spa kit. Regular cleaning = longer life + better sound.
Essential Beginner Clarinet Gear
You don’t need the fanciest equipment to start playing clarinet, but having the right tools makes a huge difference in your experience—trust me on this one.
Reeds: Start with Strength 2 or 2.5
The reed is where your sound starts.
Beginners should use:
- Strength 2 or 2.5 – Soft enough to play, firm enough to control
- Brands like Rico, Vandoren, or D’Addario Reserve
Pro Tip: Buy a box of 10. Reeds break or wear out fast. Having backups = less stress.
Ligature & Mouthpiece
Your clarinet should come with both.
If not, here’s what to know:
- Mouthpiece: Start with the standard one included.
- Ligature: Holds the reed in place. Avoid super cheap ones—they mess with your tone.
Swab, Cork Grease & a Good Case
These are your day-one essentials:
- Swab after every session
- Grease corks once a week
- Keep everything in a hard-shell case
Optional but awesome:
- Neck strap (for younger/smaller players)
- Reed case (helps reeds last longer)
- Music stand (you’ll thank me later)
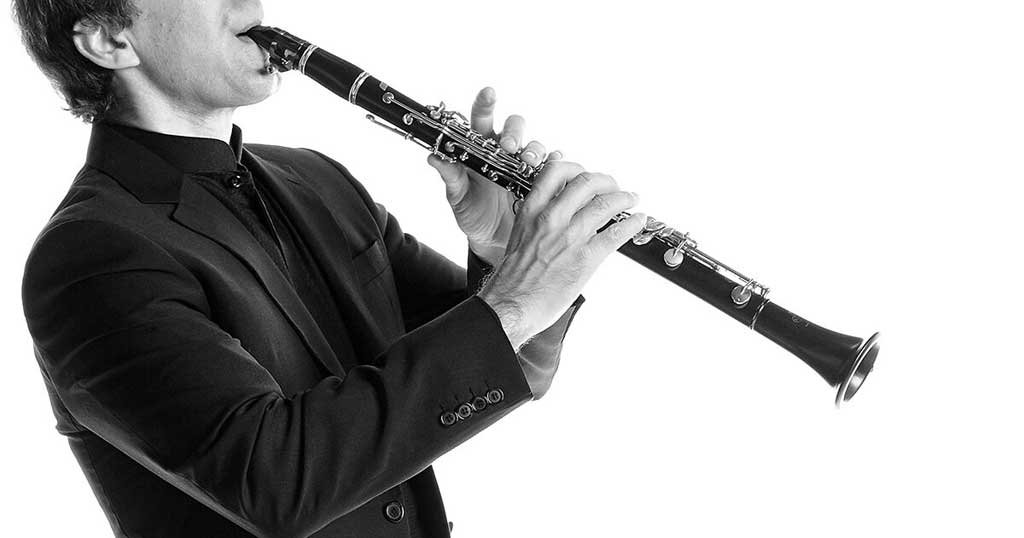
Learning the Right Embouchure – Your First Big Clarinet Skill
Okay, let’s talk embouchure (pronounced: “om-boo-shure”). Weird word, right? But if you want to make your clarinet sound even kind of decent, this is the #1 thing you’ve got to learn right away.
What Even Is Embouchure?
Embouchure is just a fancy term for how you shape your mouth around the mouthpiece when playing.
It includes:
- Your lips
- Your teeth
- Your jaw position
- Your chin
- And even how much mouthpiece you put in
Think of it like your clarinet’s voice box—if the embouchure is off, the sound will be too. But if you get it right? Woo boy, it can sound so smooth.
How to Form a Proper Beginner Embouchure
Here’s a simple, beginner-friendly checklist you can try in front of a mirror (trust me, it helps!):
- Roll your bottom lip slightly over your bottom teeth — like a soft cushion.
- Place the mouthpiece gently on your bottom lip, about ½ to ⅓ of the way in.
- Top teeth rest on the mouthpiece – not biting, just resting.
- Seal with the corners of your mouth – imagine sipping from a straw.
- Flatten the chin – not scrunched or bunched.
- Firm, but not tight. You’re aiming for control, not clenching.
Imagine blowing through the clarinet with a focused, steady stream of air—not like blowing out birthday candles!
Common Embouchure Mistakes Beginners Make
- Biting too hard on the mouthpiece (causes squeaks & sore jaw)
- Puffed cheeks (wastes air and messes with tone)
- Too little mouthpiece in the mouth (creates a muffled sound)
- Loose corners (air leaks and airy tone)
What helps? Practice just the mouthpiece—no clarinet. Try getting a steady pitch. You’ll start to “feel” what works.
Embouchure Exercises to Build Strength
Yep, just like going to the gym (but way less sweaty).
Try these:
- Long tones (hold a note for 10–15 seconds with steady air)
- Mouthpiece-only tones (great for pitch control)
- “Silent buzz” – hold embouchure shape without playing and blow air
Be patient! You’re training facial muscles you’ve never used this way before. It made me feel super awkward at first, but soon it becomes second nature.
Breathing – The Secret Sauce of Great Clarinet Sound
Surprise! Learning clarinet is just as much about your lungs and air control as your fingers. Without proper breathing, your tone will be airy, inconsistent, or just… meh.
But don’t worry. It’s not hard once you know how.
Use Your Diaphragm – Not Just Your Chest
You know how babies breathe? Their bellies move up and down—not their shoulders. That’s diaphragmatic breathing, and it’s what clarinet players need.
Why? Because:
- It gives you more control
- You can hold notes longer
- It helps prevent dizziness (yep, that’s a thing)
How to Practice Proper Breathing
Try this right now:
- Put one hand on your belly.
- Inhale through your nose.
- Your belly should rise—not your chest.
- Exhale slowly through your mouth, as if blowing through a straw.
Feels weird? Good. That means you’re doing it right. Now apply that to your clarinet.
Simple Breathing Exercises for Beginners
- Breath control: Blow out for 10 seconds. Then 15. Then 20.
- Silent inhalation: Breathe in without lifting shoulders. Then play a note.
- Balloon trick: Practice inflating a balloon slowly—it builds lung power and control.
Avoiding Common Breathing Mistakes
- Gasping for air between notes (creates sloppy phrasing)
- Playing until you run out of breath (tone dies out)
- Breathing too shallow (makes your sound airy)
Try counting in your head while playing, and plan when you’ll breathe—just like a singer would.
Fun fact: Many clarinet players study singing techniques to help with breath control. Cool, right?
Posture & Hand Position – Don’t Let Tension Steal Your Sound
Let’s talk body language. The way you sit or stand directly affects your sound—and your comfort.
Ever seen a beginner slouched over with their clarinet half-sideways, puffing red in the face? That’s what we’re avoiding here.
Sitting vs. Standing – Both Are Fine!
Whether you’re standing or sitting, the same rules apply:
- Back straight, not stiff
- Shoulders relaxed
- Elbows away from your body slightly
- Feet flat on the floor (no slouching into the chair)
Think “tall and proud,” like you’re presenting your sound to an audience—even if you’re alone in your room.
Where to Put Those Fingers?
Clarinet has 6 main finger holes + a few keys for your thumbs and pinkies.
Start with:
- Left hand on top
- Right hand on bottom
- Thumbs behind the instrument (left thumb for the register key, right thumb supports the weight)
Your fingers should be:
- Curved, not flat
- Hovering gently over the keys
- Close to the holes, not flying around
Avoid These Beginner Hand Position Mistakes
- Death grip: squeezing the clarinet too tightly
- Tense wrists: leads to fatigue or even injury
- Finger pancakes: laying your fingers flat instead of curved
You’ll be faster, cleaner, and more accurate if you keep your hands relaxed. Plus, you won’t be sore after practicing!
Remember: “Light and loose” = freedom and flexibility.
What About Neck Straps?
Neck straps aren’t just for saxophone players! If your arms get tired easily (especially for younger players), a clarinet neck strap can help.
It takes some of the weight off your right thumb, and trust me—it makes long practice sessions waaaay more comfortable.
Making Your First Sounds – Don’t Worry, Everyone Squeaks!
Alright, friend. You’ve got your clarinet assembled, your embouchure ready, and your posture solid. Now it’s time for the real deal: actually playing your first sounds.
Feeling nervous? That’s totally normal. But here’s a secret: everyone squeaks at first. Like, everyone. I squeaked so hard my cat jumped off the couch and glared at me. True story.
So, let’s learn how to make a real sound on your clarinet without freaking out.
How to Blow Properly
Playing clarinet isn’t like blowing into a straw or whistling. It’s more about controlled air and keeping your embouchure steady.
Here’s the step-by-step:
- Form your embouchure first (remember? bottom lip tucked, flat chin, tight corners).
- Take a full breath using your diaphragm.
- Insert the mouthpiece about 1/3 of the way into your mouth.
- Blow a focused, steady stream of air through the instrument—don’t puff your cheeks!
- Keep your body relaxed and your air pressure even.
That’s it! You’ll probably make a honky, duck-like noise at first. Or no noise at all. Or maybe a sudden squeak that sounds like a rubber chicken. That’s okay!
Just keep adjusting your air pressure, reed placement, and embouchure until you get a clear tone.
Why Do I Keep Squeaking?
Ah yes, the squeak—the clarinet’s rite of passage.
Here are some common causes:
- Too much mouthpiece in your mouth
- Too tight of an embouchure (biting the reed)
- Leaky embouchure (loose lips = airy sound)
- Old or damaged reed
- Finger holes not covered fully (especially with G, A, B)
Quick fix: Try playing just the mouthpiece and barrel. It helps isolate air control and embouchure.
And remember: squeaks are learning moments. Each one teaches you what not to do. It’s all part of the process.
Playing Your First Notes and Easy Songs
Now that you’re making sound, let’s get you playing actual notes. This is where it starts to feel real—and rewarding.
Your First Notes: E, D, C, G, A, B
Let’s start simple, with the easiest notes (no crazy pinky keys yet):
- E: All fingers down on both hands
- D: Same as E, but add the bottom pinky key
- C: All right-hand fingers + thumb
- G: No fingers! Just your left-hand thumb on the back key
- A: Add your left-hand index finger
- B: Add left-hand middle finger
These notes let you play some basic songs like:
- “Hot Cross Buns”
- “Mary Had a Little Lamb”
- “Twinkle, Twinkle Little Star”
Even if it’s slow and squeaky at first, you’re making music, friend! That’s no small thing.
Practice Tips for Your First Week
Set up a chill, no-pressure routine like this:
- 5 min warm-up (long tones on G or B)
- 10 min note practice (E-D-C, G-A-B patterns)
- 5 min try an easy song
- 2 min swab and clean up
Keep practice short and sweet. Your mouth will get tired quickly at first—and that’s normal!
Learning to Read Music for Clarinet
You’ve probably noticed those weird dots and squiggles on your sheet music. Yeah, those actually mean something.
Let’s demystify it—no fancy jargon, just simple stuff to get you reading and playing fast.
Clarinet Is a Transposing Instrument (in Bb)
This means that when you play a C, it actually sounds like a Bb on the piano. But honestly? Don’t stress about that now.
Just remember: you play the note that’s written for clarinet music—you don’t need to transpose anything unless you’re composing or working with other instruments.
Reading Notes and Rhythms
Start with the treble clef staff, which has 5 lines and 4 spaces.
The note names from bottom to top are:
- Lines: E – G – B – D – F (“Every Good Boy Deserves Fudge”)
- Spaces: F – A – C – E (just spell “FACE”)
Clarinet method books (like Essential Elements or Rubank) start with:
- Whole notes (4 beats)
- Half notes (2 beats)
- Quarter notes (1 beat)
- Eighth notes (½ beat)
Tip: Clap and count rhythms before you try to play them. It helps big time.
Matching Notes to Fingerings
Every note has a fingering.
You’ll get used to this quickly with:
- A fingering chart (print one out or use a free app)
- Visual aids in your method book
- Practicing slowly and consistently
It might feel like a total brain workout at first, but I promise—it becomes second nature before you know it.
Clarinet Practice Tips That Make a Huge Difference
So, you’ve got your notes, your embouchure’s coming along, and your fingers are starting to do what you want. Awesome! Now comes the part that turns beginners into real musicians: practice.
But wait… don’t groan just yet! Practice doesn’t have to be boring or painful. In fact, with the right approach, it can actually be fun and really satisfying. Trust me—I’ve been there.
Short, Focused Sessions Are Best
Here’s the truth: You don’t need to practice for hours to get better. Especially not in the beginning.
Start with 15–30 minutes a day, and stick to it.
Here’s a simple routine that works wonders:
Daily Practice Routine for Beginners:
- Warm-up (5 mins) – Long tones (G, A, B) to build control.
- Technique (10 mins) – Play scales or simple note patterns.
- Songs (10 mins) – Practice pieces you’re learning.
- Cool down (5 mins) – Something fun or free-play!
That’s it. You’re done in 30 minutes and building real skills.
Use a Metronome and Tuner
Okay, I know these sound super nerdy… but they’re your best friends.
- Metronome keeps your rhythm steady. No more speeding up or slowing down without realizing it!
- Tuner helps you stay in tune. Clarinet pitch can be wobbly, especially at first.
There are free apps for both—just search “metronome” and “tuner” in your app store.
Quick Tip: Start slow. Play perfectly at a slow speed before trying to go faster.
Set Small Goals (And Celebrate Wins!)
Learning clarinet is a journey. Some days you’ll feel like a genius. Other days? Like you’ve never held an instrument in your life.
To keep your motivation up:
- Set micro-goals like “I’ll master B-A-G cleanly” or “no squeaks for one full note.”
- Track progress in a journal or app
- Celebrate when you hit a goal—seriously, treat yourself!
Every bit of progress is worth celebrating. Don’t downplay your wins. You’re doing something amazing.
The Magic of Slow Practice
One of the best clarinet secrets ever? Go slow. Slower than you think.
Slow playing:
- Builds better muscle memory
- Reduces mistakes
- Makes you really listen to your tone
It may feel like you’re crawling at first, but this is how professionals practice too. Go slow now to play fast later.
Clarinet Care & Maintenance
Let’s talk about something not-so-glamorous—but totally essential: taking care of your clarinet.
I know, I know. It’s tempting to toss it in the case and walk away after practice. But a dirty clarinet = bad tone + more squeaks + broken parts.
So here’s how to keep your clarinet healthy and happy.
Swab It After Every Use
Your clarinet gets moist from your breath.
If you leave moisture inside, it can:
- Damage pads
- Warp the wood (if it’s wooden)
- Smell… really bad
Use a pull-through swab after every session:
- Take your clarinet apart
- Drop the swab through each piece
- Gently pull through to absorb moisture
It takes 2 minutes. Totally worth it.
Dry the Mouthpiece
Your mouthpiece collects spit, reed goo, and mystery funk.
Clean it once a week:
- Use warm (not hot) water
- A mouthpiece brush or soft toothbrush
- Don’t scrub too hard—mouthpieces are delicate!
Don’t soak your mouthpiece or reed in water overnight. Ever. That’s a fast track to disaster.
Grease the Corks
Cork grease is your clarinet’s best friend.
It:
- Keeps joints from sticking
- Prevents cork from drying out or cracking
Use it once a week or when the pieces feel hard to twist together.
Reed Rotation & Storage
Rookie mistake: using the same reed until it dies.
Reeds wear out fast. Rotate 3–4 at a time to extend their life.
Store them in:
- A reed guard or case with ventilation
- A cool, dry place—not the top of your hot TV!
Never leave your reed on the mouthpiece overnight. It can mold. (Yuck.)
Signs Your Clarinet Needs Repair
Watch out for:
- Sticky keys
- Leaky pads
- Loose screws
- Cracks (especially in wood clarinets)
- Notes not speaking clearly even with perfect embouchure
If something feels off, take it to a repair tech. Don’t try to fix serious issues yourself!
Joining a Band or Taking Lessons
Learning on your own is cool—but at some point, playing with others is a total game-changer. Here’s why.
Why Playing with Others Helps So Much
When you play in a band or ensemble:
- You learn to listen (like, really listen)
- You keep better rhythm
- You grow faster as a musician
- You make new friends!
Band isn’t just for kids, either. Adults join local concert bands, jazz groups, or community orchestras all the time. You’re never too old to join in.
Taking Lessons—In Person or Online
A private teacher helps you:
- Correct bad habits early
- Learn faster and more efficiently
- Get feedback that YouTube can’t give you
Can’t afford weekly lessons? Try:
- Monthly check-ins
- Group classes
- YouTube + books (like Essential Elements or Rubank Beginner Method)
You can learn a lot solo—but having a guide accelerates your growth so much.
Overcoming Performance Nerves
Playing in front of people can be scary—100%.
But here’s how to beat stage fright:
- Practice your pieces until they feel automatic
- Play for a friend or family member first
- Breathe deeply before you play
- Focus on the music, not the audience
I’ve had sweaty palms and butterflies too—but when I finished my first group concert? It filled me with joy. I felt proud, connected, and alive. Can you imagine that feeling? You’ll get there too.
Common Beginner Mistakes (and How to Avoid Them!)
Even the best clarinetists were squeaky beginners once. Let’s talk about the classic blunders we all make—and how you can skip the frustration.
Squeezing or Biting the Reed
- Causes squeaks, flat notes, and jaw fatigue.
- Fix it: keep a relaxed jaw, use proper embouchure.
Puffed Cheeks
- Wastes air and kills tone.
- Fix it: tighten corners of your mouth, keep cheeks flat.
Poor Finger Technique
- Flat fingers, tense hands = slow and sloppy playing.
- Fix it: curve fingers, keep close to the keys, relax!
Ignoring Cleaning & Maintenance
- Leads to sticky pads, smelly cases, cracked corks.
- Fix it: swab every time, clean weekly, store properly.
Skipping Warm-Ups
- Increases tension, bad tone, and slower progress.
- Fix it: spend 5–10 minutes on long tones and easy notes.
Staying Motivated When Progress Feels Slow
Alright, real talk? Learning the clarinet is a journey. Some days, it’s going to feel like you’re on fire (in a good way), nailing your notes and sounding like a pro. Other days? Ugh… like you’re back at square one.
That’s totally normal.
So let’s talk about how to keep your fire burning, even when you hit those “Why am I doing this?” moments.
Progress Is Not Always Linear
Some weeks you’ll make huge strides. Other times, it’ll feel like nothing’s clicking. That’s part of the process. The trick is to keep showing up.
Even a 10-minute practice on a tough day keeps the habit going. And that’s powerful.
Celebrate the Small Wins
- Your first clean note? Worth a fist pump.
- Played a song from start to finish? Heck yes—record it!
- Practiced four days in a row? That’s consistency, baby.
Document your wins. Post a clip. Share with a friend. Let yourself feel proud.
Listen to Inspiring Clarinetists
Let the greats motivate you! Listen to:
- Benny Goodman (Jazz)
- Sabine Meyer (Classical)
- Martin Fröst (Contemporary genius)
- Julian Bliss (Fantastic modern player)
It’s like getting a glimpse of what’s possible. And it can fire you up big time.
Find a Clarinet Buddy or Online Community
You’re not alone in this. Join beginner forums or clarinet Facebook groups. Share your challenges. Ask questions. Laugh at your squeaks together.
You’ll be amazed how many people are on the same journey.
Remember Why You Started
Was it to learn something new? Join a band? Play that one song you love?
Write it down and keep it somewhere visible. On tough days, that reminder can push you forward.
It made me feel so connected when I could finally play “Somewhere Over the Rainbow” after months of practice. I was shaky, but it brought tears to my eyes. I never forgot that moment. Can you imagine how incredible your moment will feel?
Conclusion: You’re on Your Way, Clarinet Star!
Whew—look how far you’ve come already!
You’ve learned:
- What makes the clarinet special
- How to set it up and care for it
- Embouchure, breathing, posture, and hand position
- How to play your first notes and songs
- Practice routines that actually help
- Motivation tips to stay inspired
Most importantly? You’ve committed to learning something beautiful. Something powerful. Music has a way of changing us—of opening parts of our hearts and minds we didn’t know were there.
So even on squeaky days, keep going. You’re building something amazing with every note.
Please read more about the best clarinet.
FAQs – Beginner Clarinet Questions, Answered!
How long should I practice each day as a beginner?
Start with 15 to 30 minutes a day, 4–6 days a week. The key is consistency. A little each day is better than a long session once a week.
How do I know when to replace my reed?
If your reed:
- Sounds dull or fuzzy
- Has chips or cracks
- Feels soft and worn out
…it’s time for a new one. Most reeds last 1–2 weeks with daily use.
Why does my clarinet squeak so much?
Common reasons:
- Biting the reed
- Too much or too little mouthpiece
- Leaky embouchure
- Dirty or warped reed
- Not sealing the tone holes fully
Take a step back and review your posture, embouchure, and breath support. It’ll improve with practice!
What’s the best beginner clarinet to buy?
Reliable beginner models:
- Yamaha YCL-255
- Buffet Prodige
- Jupiter JCL700N
Avoid super cheap brands with no name recognition—they often break easily and don’t sound good.
Can I teach myself the clarinet without a teacher?
Yes, you can—especially with books, videos, and online tools. But working with a teacher (even monthly) helps you avoid bad habits and improve faster.